|
|
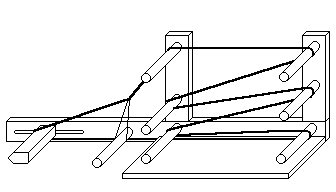
The next step is warping the loom. This is
the process of wrapping the warp threads around the pegs
of the loom. The exact path that the warp threads take is
dependent on your particular loom and the length of band
you wish to weave. The following description should be fairly
universal though. Your first step is to make sure that your
tensioning device is fully extended. If this is not done,
you may not be able to adjust the tension as the band shortens.
When I warp my loom, I am using thread from very large cones.
So, to begin, I need to determine how many consecutive threads
of the same color will pass through heddles. For an example
here, I will use the design notation above. First, I would
slide four (4) heddles onto the end of the white string.
Then, using a slip knot, create a loop in the string and
slide that loop over the front bar (on my loom, this front
bar is also the tension adjustment device). Now, slide one
of the heddles separate from the others and hook it to the
heddle bar. Take the warp and wrap it up and over the top
front peg, over the top peg at the back, down to the second
peg at the front, back to the second peg at the back, and
continue down in a zig-zag motion until all the pegs have
been warped and finally bringing the warp back under the
front bar (the one onto which you tied the thread to begin).
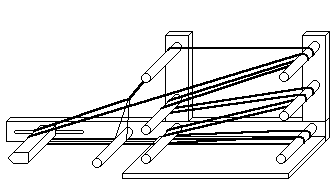
 Continue to wrap. This time, do not slide a heddle down,
and pass the thread under the top front peg. The rest of
the warping for this wrap continues in the same manner as
the previous wrap.
For the third wrap, the color still remains the same but
this time I need to use a heddle again and wrap over the
top front peg again. This warping continues in like manner
until you need to switch colors.
 To switch colors, get your second color ready, sliding heddles
onto the thread if necessary. While holding the first color,
cut the warp at a position that is between the front bar
and the heddles (but close to or at that front bar). Keep
a hold on that warp so that the tension is maintained. Tie
on the new warp color. I just hold the two threads and tie
a simple overhand knot. For the type of threads I usually
use, this is sufficient. When working with silk, I tie using
a square knot because the threads are more slippery and may
pull out of a simple overhand knot. With the new warp tied
on, continue with the warping. You may notice that this is
creating one long strand of warp. This is known as a continuous
warp. When you have come to the end of the warping process,
take the warp thread and secure it in some way to maintain
the tension. I usually just wind it a few times around one
of the pegs. With your hands now free, you need to untie
the slip knot that you used to secure the warp initially.
Make sure that this beginning end of the warp thread passes
over the front bar. While holding the starting end of the
warp with one hand, free the ending part of the warp with
the other hand. Bring the ending warp under the front bar
and cross it over to the side of the loom where your starting
warp is located. Now, tie these two ends together. This completes
the "continuous warp". You are almost ready to
weave! |